Have you created your e-commerce site using the Shopify platform?
With the "Shopify" app, transfer sales from your merchant site directly to your management application!
With the "Shopify" connector, contacts, products and orders placed online by your customers arrive automatically in incwo.
No re-keying required! You'll find all your website's sales data in incwo, and can track deliveries and customer invoicing from a central point.
Activating the "Shopify" app allows you to connect your e-commerce site to incwo for :
- Synchronize your contacts, product catalogs and customer orders from your merchant site with data from your management and billing application
- Enable automatic data synchronization
- Select a user to be notified when new orders arrive on your management and billing application
- Automatically create sales documents such as sales orders and/or invoices in incwo, as soon as they are received on your e-commerce site.
1. Creating the webservice on Shopify
To create the webservice and retrieve the API key and password, go to the "Application" or "Settings" menu in your Shopify account, then create a new app.
- Click on "new app
- Give the webservice a name: incwo, for example, and associate it with your email address.
- Create the app
- Then configure all read and write authorizations in the "API admin" block (product, order, customer, payment etc.). Set "Read and write" for all present modules in "Configuration" and "Overview")
- Save to confirm
Then go to the "API ID" tab and install the web service on Shopify.
Once the API has been triggered, retrieve the incwo connection token from your Admin API Access, i.e. from the "API identifier" tab.
Warning This unique code is displayed only once when the API is created. Once revealed, we strongly advise you to copy/paste it in a secure place to avoid losing it.
This code begins with "shpat_" and is followed by numbers. This is the secret password you'll need to enter on incwo.
Then retrieve the API key and enter this information on your e-shop configurator in incwo.
You will then be able to perform your first data synchronization.
2. Shopify connection with incwo
To create the Shopify connector, go to the app's home page or the "Sales" menu, then "Web Shops" and "List".
Click on "Add a Shopify account" or "+Shopify".
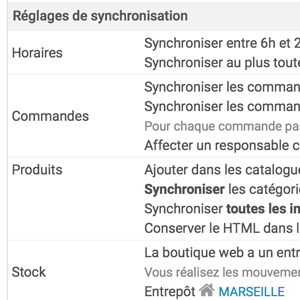
Define the connector parameters:
- Enter the name of your store and the user to be notified
- Set synchronization (times, synchronized data)
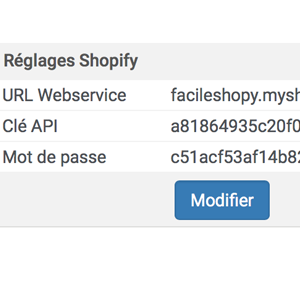
Indicate
- Webservice URL of your e-commerce site, in the format: shopname.myshopify.com/admin (do not enter "https://www")
- The API key used to connect to the service.
- The secret password linked to the API key. (format: shapt_xxxxxx....)
- Save your settings.
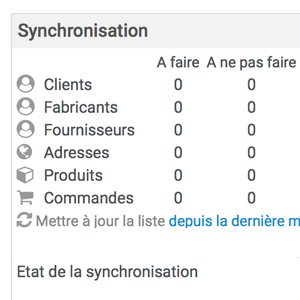
To synchronize your data, click on the "Prepare for synchronization" link.
The page then displays a list of new store items to be synchronized: customer contacts, supplier contacts, products, orders, etc. Start synchronization to add the items to your Virtual Office, by clicking on "Synchronize".
You can then activate automatic synchronization.
If your server is protected by a firewall, you need to whiltelist the incwo addresses: 185.16.44.
The first synchronization can take from several hours to several days, depending on the volume of data to be synchronized.
3. Connect multiple Shopify stores
If you have several stores (one for consumers and one for professionals), create 2 connectors.
Each store has its own API key and can be connected to incwo via its own key.